


If you have ever tried to build a react table, you know how challenging it can be. You might want to use a component library like material UI, but the downside is that it adds a lot of javascript to your browser, since it is a client side component.
But now this problem is solved with a new component DATA TABLE by shadcn UI.
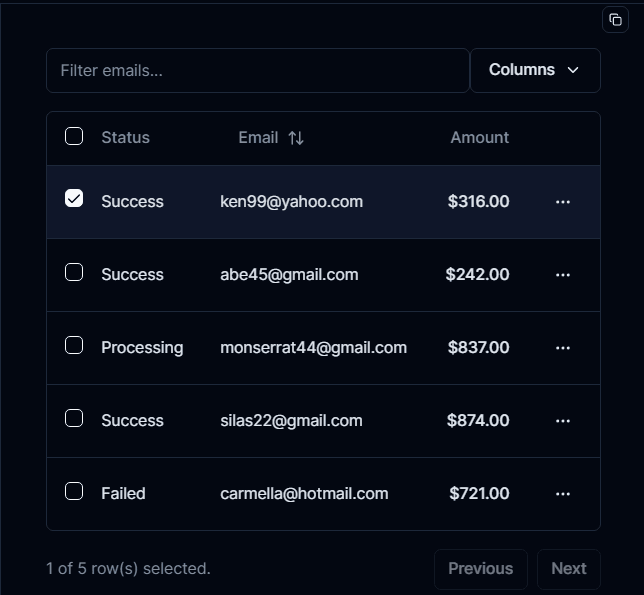
You can filter and sort the email, can check all the fields, can enable and disable any sort of columns, and above all this have built-in pagination
So let's build it
first of all install the npm package by running command
npm install @tanstack/react-table
and here is the folder structure:
Folder structure
app
└── payments
├── columns.tsx
├── data-table.tsx
└── page.tsx
The column component is where we declare what data is shown for each column for example the email and amount
and to display all the information we will use the DataTable component which will handle all the data
Code
read the comments within the code:
Column.tsx:
"use client"

import { ColumnDef } from "@tanstack/react-table"

// This type is used to define the shape of our data. e.g we want our id to be string and status none other than these four options
export type Payment = {
  id: string
  amount: number
  status: "pending" | "processing" | "success" | "failed"
  email: string
}

export const columns: ColumnDef<Payment>[] = [
//we can set normal fields like this
  {
    accessorKey: "status",
    header: "Status",
  },
  {
    accessorKey: "email",
    header: "Email",
  },
//
  {
    accessorKey: "amount",
    header: () => <div className="text-right">Amount</div>,
    cell: ({ row }) => {
      const amount = parseFloat(row.getValue("amount"))
      const formatted = new Intl.NumberFormat("en-US", {
        style: "currency",
        currency: "USD",
      }).format(amount)

//we can format the amount in any currency without any use of external package

      return <div className="text-right font-medium">{formatted}</div>
    },
  },
]
DataTable.tsx
"use client"
//we have to import a lot of things and here are they
import {
  ColumnDef,
  flexRender,
  getCoreRowModel,
  useReactTable,
} from "@tanstack/react-table"

import {
  Table,
  TableBody,
  TableCell,
  TableHead,
  TableHeader,
  TableRow,
} from "@/components/ui/table"

//now we are expecting 2 props: columns and the data(that we are expecting from the page component)
interface DataTableProps<TData, TValue> {
  columns: ColumnDef<TData, TValue>[]
  data: TData[]
}

export function DataTable<TData, TValue>({
  columns,
  data,
}: DataTableProps<TData, TValue>) {
// and now we will use this useReactTable hook
  const table = useReactTable({
    data,
    columns,
    getCoreRowModel: getCoreRowModel(),
getPaginationRowModel: getPaginationRowModel()

// and yes adding pagination can be done with just this above one line

  })

  return (
    <div className="rounded-md border">
      <Table>
        <TableHeader>
          {table.getHeaderGroups().map((headerGroup) => (
            <TableRow key={headerGroup.id}>
              {headerGroup.headers.map((header) => {
                return (
                  <TableHead key={header.id}>
                    {header.isPlaceholder
                      ? null
                      : flexRender(
                          header.column.columnDef.header,
                          header.getContext()
                        )}
                  </TableHead>
                )
              })}
            </TableRow>
          ))}
        </TableHeader>
        <TableBody>
          {table.getRowModel().rows?.length ? (
            table.getRowModel().rows.map((row) => (
              <TableRow
                key={row.id}
                data-state={row.getIsSelected() && "selected"}
              >
                {row.getVisibleCells().map((cell) => (
                  <TableCell key={cell.id}>
                    {flexRender(cell.column.columnDef.cell, cell.getContext())}
                  </TableCell>
                ))}
              </TableRow>
            ))
          ) : (
            <TableRow>
              <TableCell colSpan={columns.length} className="h-24 text-center">
                No results.
              </TableCell>
            </TableRow>
          )}
        </TableBody>
      </Table>

//now to use the pagination we will use the buttons

<button onClick={()=>table.previouspage()}>Previous page</button>
<button onClick={()=>table.nextpage()}>Next Page</button>
    </div>
  )
}
and here is out page.tsx folder:
import { Payment, columns } from "./columns"
import { DataTable } from "./data-table"

async function getData(): Promise<Payment[]> {
// and this Payment[] is imported from .columns which will again controll the type of that data that is passed from the server component to the client component

// Fetch data from your API here.

  return [
    {
      id: "728ed52f",
      amount: 100,
      status: "pending",
      email: "m@example.com",
    },
    // ...
  ]
}

export default async function DemoPage() {
  const data = await getData()

  return (
    <div className="container mx-auto py-10">
      <DataTable columns={columns} data={data} />
    </div>
  )
}
and that's all, don't forget to check the official documentation of the component


No comments:
Post a Comment