


Cookies are discreet data packages stored within our browsers, often carrying various purposes. Some intrusively encroach on privacy, while others aim to enhance the browsing encounter by recording browsing patterns, preferences, and other relevant information. Cookies play a valuable role in tasks like authentication, optimizing user experience, ensuring faster response times, and more.
In this write-up, we will delve into two toolsets that enable the establishment of cookies within a Next.js application, and we'll integrate them into a practical scenario. To actively participate, navigate to the corresponding GitHub repository linked here. Let's initiate the exploration!
Jump ahead:
- Cookies: Boon or ban?
- Working with react-cookies in Next.js
- Using the cookies-next package in Next.js
- Conclusion
Cookies: Boon or ban?
Cookies are small text files that websites store on users' computers. They have been a topic of discussion due to their advantages and disadvantages. On the positive side, cookies can enhance user experience by remembering preferences and settings, thus improving sessions and personalization. However, the ability of cookies to track users' online behavior raises privacy concerns. To address this, many websites adhere to standards that require them to disclose their use of cookies and provide users with the option to opt-out.
Moreover, certain web browsers offer users the ability to delete or remove cookies, providing a measure of privacy protection. While cookies can be beneficial for both users and websites, it is crucial to follow regulations and be mindful of potential privacy risks. Users are increasingly cautious, opting for different browsers to manage and disable cookies and advertisements. Ultimately, the responsible use of cookies falls on the shoulders of both users and website administrators, who must weigh the benefits against potential drawbacks.
Working with react-cookies in Next.js
The first package we will explore is react-cookies. This package aims to help you load and save cookies within your React application. Let’s create a simple application that keeps track of registered users.
If you haven’t already, launch a Next.js app by typing the following command:
npx create-next-app --ts
With that done, install react-cookie with the following code:
npm install react-cookie
To start using the Hooks, add the CookiesProvider component in the _app.tsx file, like so:
import type { AppProps } from 'next/app';
import { CookiesProvider } from 'react-cookie';

function MyApp({ Component, pageProps }: AppProps) {
  return (
    <CookiesProvider>
      <Component {...pageProps} />
    </CookiesProvider>
  );
}

export default MyApp;
With this done, the Hooks are now available from any part of your application. Start using it by importing the useCookies Hook, as shown below:
import { useCookies } from 'react-cookie';
We can now fetch, add, and remove cookies from the application. Let’s start off by adding a useEffect Hook to fetch all cookies on load:
import { useCookies } from 'react-cookie';

const [cookies, setCookie, removeCookie] = useCookies(['user']);
const Home: NextPage = () => {
  useEffect(() => {
    console.log('Cookies: ', cookies);
  }, [cookies]);

  return (
  <div>...</div>
)}
For now, you shouldn’t be able to see any cookies. So, let’s create a function to set cookies using the setCookie() function:
import { useRouter } from 'next/router'

//...inside the defualt function
const router = useRouter();

const setCookieHandler = () => {
  setCookie('new-user', true, {
    path: '/',
  });

  router.replace("/");
};
The `setCookie()` function is designed with three parameters: the key, key-value pair, and various configuration options such as MaxAge, Path, Domain, and expires. In this particular instance, the path option was utilized to enable access to the cookie from any location.
Additionally, the `useRouter()` Hook was employed to reload the page, utilizing the replace() method to prevent the addition of a URL entry into the history stack. This results in the appearance of a simple page re-render.
It's important to note that this tutorial specifically aims to showcase the functionalities of certain packages. Consequently, it assumes a foundational understanding of concepts like authentication flow. For a more in-depth exploration of authentication in Next.js, please refer to the provided guide. Further insights into authentication flows can be found in the accompanying article.
Binding a function to a button
Next up, let’s bind this function to a button. Input the following code:
{!cookies['user'] && (
  <button onClick={setCookieHandler} className={styles.button}>
    Complete new user registration!
  </button>
)}
In this case, the button will only render if the cookie exists. Go ahead and run the development server to see this in action. You can see this cookie visually using the dev tools by triggering Control+Shift+J and then selecting the Application section, as shown below:
With that done, let’s remove the cookie to allow the user to sign out. First, write another function:
const removeCookieHandler = () => {
  removeCookie('new-user');

  router.replace("/");
};
Now, bind it to another button that will only render if the cookie is available. What does that mean? The cookie will be available if the user is registered. Here’s what that will look like:
{cookies['new-user'] && (
  <button onClick={removeCookieHandler} className={styles.resetbutton}>
    Reset new user registration
  </button>
)}
With that done, let’s explore the second package, cookies-next.
Using the cookies-next package in Next.js
Moving forward, we will look at how to use the cookies-next package. This package fits more with the Next.js ecosystem because it can be used anywhere on the client side, on the server side through getServerSideProps, and even with Next.js API routes. Here are the two packages head-to-head:
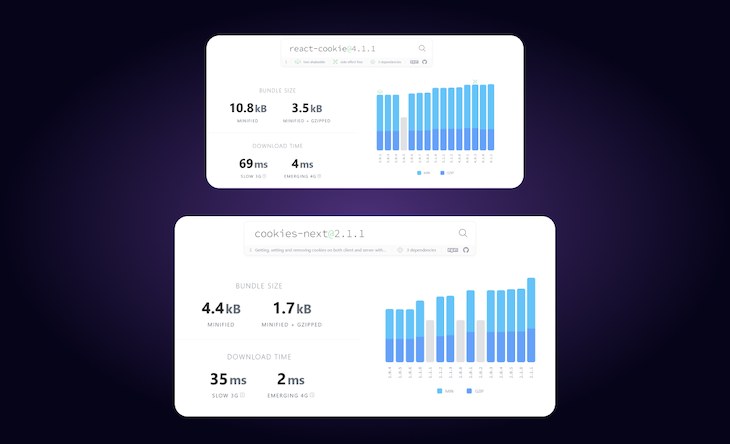
Another surprising fact about cookies-next (this one’s for all the bundle-phobic developers) is that it’s almost half the size of react-cookie. Essentially, making it more desirable to use it in your next project!🎉
As tradition goes, let’s start off by installing cookies-next with the following command:
npm install cookies-next
The cookies-next package comes inbuilt with similar functions to the react-cookies package. These functions can be used for setting and removing cookies. Let’s create handler functions for setting and removing cookies with the following code:
// adding cookies
const addCookie = () => {
  setCookie('user', true, {
    path: '/',
  });
  router.replace('/');
};

// removing cookies
const removeCookie = () => {
  deleteCookie('user', {
    path: '/',
  });
  router.replace('/');
};
Once you've completed the setup, you can proceed to experiment with it by associating it with various buttons that appear based on the existence of the cookie. In addition to utilizing getServerSideProps and API routes, cookies-next is applicable to the server side of the application as well. Consider an instance where a user receives certain information, validates it, and then establishes a cookie to signify the legitimacy of the information, all within an API route.
Implementing API routes
Go ahead and make a new API route inside ./pages/api/verify-otp.ts. Inside the file, create a basic handler function with the following code:
export default function handler (
  req: NextApiRequest,
  res: NextApiResponse
) {
  return;
}
The cookie will be set to indicate the trustworthiness of the user and expire after a specific period. More specifically, it will expire if there is some type of verification, such as a database to check the credentials or some OTP logic. The handler function is as follows:
if (
    req.method === 'POST' // only allow POST requests
  ) {
  // caputure the credentials required for verification from the request body
  const { name } = req.body;

  //   otp verification logic

  //   set cookie
  setCookie('authorize', true, {
    req,
    res,
    maxAge: 60 * 60 * 24 * 7, // 1 week
    path: '/',
  });

  //   respond with status and message
  return res.status(200).json({
    message: `${name} is authorized to access`,
    authorize: true,
    code: '20-0101-2092',
  });
}
Here, the cookie expires after a week and will require the user to re-verify again. On successful verification, the API responds with a status 200 message with relevant data that can be displayed in the frontend.
Accessing API routes from the frontend
Now, let’s try to access this route from the frontend. The function can be triggered only if the user is registered the first time. Create a function with the following code:
const verifyOTP = async (name: string) => {
  const response = await fetch('/api/verify-otp', {
    method: 'POST',
    body: JSON.stringify({ name }),
  });

  const data = await response.json();

  if (data.authorize) {
    setAuthorization(true);
    setLaunchCode(data.code);
  } else {
    setAuthorization(false);
    alert('Invalid OTP');
  }
};
We can use the useState Hook to store the data coming from the API route and render the button conditionally and based on the isAuthorized variable. Use the following code:
const [isAuthorized, setAuthorization] = useState(false);
const [launchCode, setLaunchCode] = useState('');
With this done, go ahead and try out the code written so far. You can check if the cookie exists by opening up the dev tools and heading selecting the Application section, as shown below:
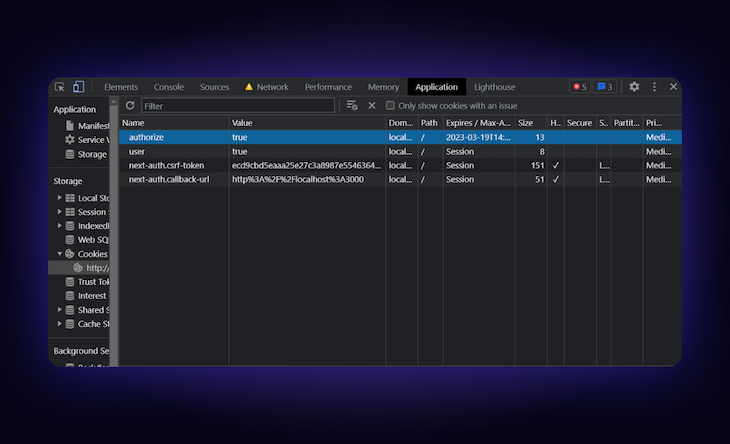
I attempted to make the example more entertaining by generating a random code at every login. It will also set a cookie on the API route. You can experiment with your own original ideas and try out something cooler! Here’s what my example looks like:
Conclusion
Cookies play a crucial role in the field of web development. Two prominent packages, react-cookie and cookies-next, serve various purposes and come with distinct features. React-cookie stands out as the more widely used option, boasting user-friendly APIs and strong compatibility with the React framework. On the other hand, cookies-next, a relatively recent addition, is specifically designed for Next.js, offering server-side rendering capabilities and heightened security measures.
Regardless of the chosen package, it is vital for developers to have a solid understanding of how cookies function and how to employ them securely to avoid potential security issues. Both react-cookie and cookies-next streamline the process of managing cookies in Next.js applications, simplifying the customization of user experience and improving website speed.


No comments:
Post a Comment