


Images play a significant role in enhancing websites, elevating user experiences, and driving higher engagement. Nevertheless, the loading time for high-quality images can be a potential source of frustration, particularly on slower internet connections.

To tackle this issue, developers must implement strategies that ensure a seamless loading experience. One effective approach is progressive image loading.
In this tutorial, we will explore the concept of progressive image loading, delve into its implementation within React, and cover other relevant aspects of this strategy.
Why progressive image loading is useful
Progressive image loading allows developers to show a lower-resolution or preview image while the full-resolution image is loading. This enhances the user experience by giving them a preview and indicating that the full image will appear shortly.
The GIF below demonstrates the use of a native <img /> element to render an image.

As we can see, although the page is already loaded, the image takes an extra second before it’s rendered, thereby causing empty spaces. The experience worsens when we have a very slow internet connection.
By using the progressive loading technique, we can render a tiny file size version of the image to decrease load time. Once the high-resolution version is loaded, we can swap the image files. See the GIF demonstration below:
Since the placeholder image loads almost immediately, this strategy can also help reduce the issue of layout shifts caused by webpage images. Be aware that layout shifts occur mainly because the browser is unaware of how much space to reserve for the image.
We can prevent this behavior by adding width and height attributes to the image. This notifies the browser to reserve a set amount of space for the image to occupy. We must then apply a max-width: 100% and a height: auto on the image in our CSS file to ensure the image behaves correctly in a responsive layout.
In this tutorial, we will learn how to improve the user experience and prevent layout shifts by loading images progressively in React from scratch. We will also learn how to use an external library to achieve the same result.
To follow this tutorial, you must have a working knowledge of React.
Progressive image loading techniques in React
The magic of progressive images is achieved by creating two image versions: the actual image, and a smaller file version, usually less than 2kB in size.
The low-quality image is loaded at first for quick display and scaled up to fit the main image width while the main image downloads. Then, a blur filter and proper CSS transitioning are applied.
React frameworks like Gatsby and Next.js also use this pattern in their image components. But instead of the users manually creating a small version of the image, the frameworks automatically generate it from the source image.
In addition, these frameworks use advanced image processing options and enable the lazy loading of images further down the screen.
In our case, the focus is progressive image loading in React. Let’s get started with the implementation.
Creating an image component
We will create an image component called ProgressiveImg to encapsulate an <img /> element and the logic for the progressive loading. This component can then be used as a replacement for the native <img /> elements.
const ProgressiveImg = ({ placeholderSrc, src, ...props }) => {
  return (
    <img
      {...{ src: placeholderSrc, ...props }}
      alt={props.alt || ""}
      className="image"
    />
  );
};
export default ProgressiveImg;
In the above code, the component receives the actual image source, its placeholder source, and every other prop that we pass. Then, we assigned these props to the <img /> element attributes.
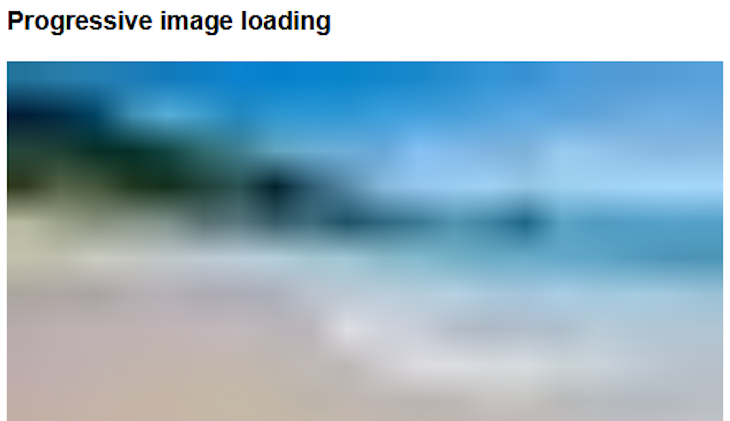
Notice how we used the … spread operator to inject any other props that the component receives. For instance, the component will receive a required image width and height, as we will see in a moment. In the meantime, we assigned a placeholder image source to the src for quick display, as we mentioned earlier.
Next, let’s ensure we pass all the above-mentioned props to the <ProgressiveImg /> like so:
import ProgressiveImg from "./components/ProgressiveImg";
import image from "./images/large_.jpg";
import placeholderSrc from "./images/tiny_.jpg";

export default function App() {
  return (
    // ...
    <ProgressiveImg
      src={image}
      placeholderSrc={placeholderSrc}
      width="700"
      height="465"
    />
    // ...
  );
}
As seen in the code, we passed the image and its small-size version that we resized to be less than 2kB. We must also pass along the image width and height to prevent layout shifts.
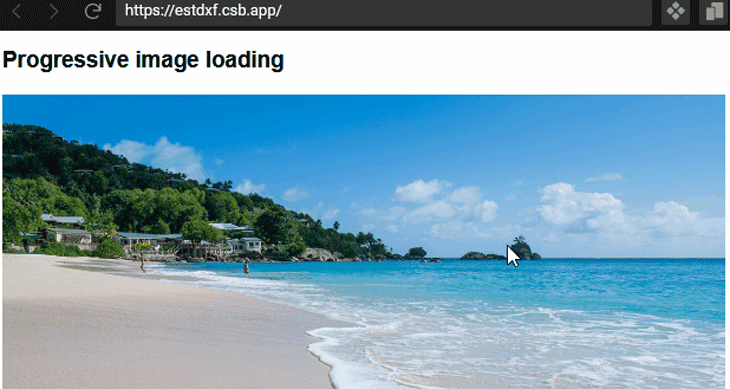
Be sure you maintain the aspect ratio if the image size is bigger than the assigned value. With this, the frontend should look like so:
Updating the thumbnail to the actual image
To update the src of the img and render the actual image, we must store the default image source in a state variable via the useState Hook. Then, we can update the variable inside a useEffect Hook once the actual image loads.
Let’s update the ProgressiveImg component so we have the following:
import { useState, useEffect } from "react";

const ProgressiveImg = ({ placeholderSrc, src, ...props }) => {
  const [imgSrc, setImgSrc] = useState(placeholderSrc || src);

  useEffect(() => {
    // update the image
  }, []);

  return (
    <img
      {...{ src: imgSrc, ...props }}
      alt={props.alt || ""}
      className="image"
    />
  );
};
export default ProgressiveImg;
Notice that the src attribute for the img is now assigned a value of the state variable. By default, this value is set to the placeholder source if we have it. Otherwise, it is assigned the main image.
Next, let’s update the useEffect Hook so we have the following:
useEffect(() => {
  const img = new Image();
  img.src = src;
  img.onload = () => {
    setImgSrc(src);
  };
}, [src]);
In this Hook, we started by creating an img element by instantiating an Image() object and setting the src attribute to the actual image source.
With the onload event handler on the image object, we can detect when the actual image has completely loaded in the background. Then, we update the image src to the actual image.
See the result below:
Implementing a transition blur
Let’s add a CSS transition blur for a smooth effect. In the ProgressiveImg component, add the following code above the return statement:
const customClass =
    placeholderSrc && imgSrc === placeholderSrc ? "loading" : "loaded";
We will dynamically add class names to the image based on the loading status.
So, update the <img /> to include the custom class name:
return (
  <img
    // ...
    className={`image ${customClass}`}
  />
);
If the actual image is still loading, we add a loading class to the image. Otherwise, we add a loaded class. We can then update the CSS to include the style rules:
.loading {
  filter: blur(10px);
  clip-path: inset(0);
}
.loaded {
  filter: blur(0px);
  transition: filter 0.5s linear;
}
Save and see the changes in the frontend. See the complete code on CodeSandbox.
Progressive image loading using a library
We can also load images progressively by using a library called react-progressive-graceful-image. To use it, we must install it:
npm i react-progressive-graceful-image
We can then import the ProgressiveImage component and implement it like so:
import ProgressiveImage from "react-progressive-graceful-image";
import image from "./images/large_.jpg";
import placeholderSrc from "./images/tiny.jpg";

export default function App() {
  return (
    // ...
    <ProgressiveImage src={image} placeholder={placeholderSrc}>
      {(src, loading) => (
        <img
          className={`image${loading ? " loading" : " loaded"}`}
          src={src}
          alt="sea beach"
          width="700"
          height="465"
        />
      )}
    </ProgressiveImage>
    // ...
  );
}
The ProgressiveImage component uses a render props technique to implement progressive image loading. In its children function prop, we have access to the src and loading arguments in the render callback.
With the loading argument, we can dynamically add classes to the img element. The loading returns true while the actual image is loading; otherwise, it returns false.
We have also added style rules for the classes in the CSS file. See the complete code and demo on CodeSandbox.
Conclusion
By incorporating a progressive image loading approach, we can significantly enhance the user experience within our React project.
In this guide, we discussed the process of progressively loading images in React, both with and without the use of an external library. I trust you have gained valuable insights and found this tutorial informative. If you have any questions or would like to make contributions, please feel free to do so in the comments section.


No comments:
Post a Comment